
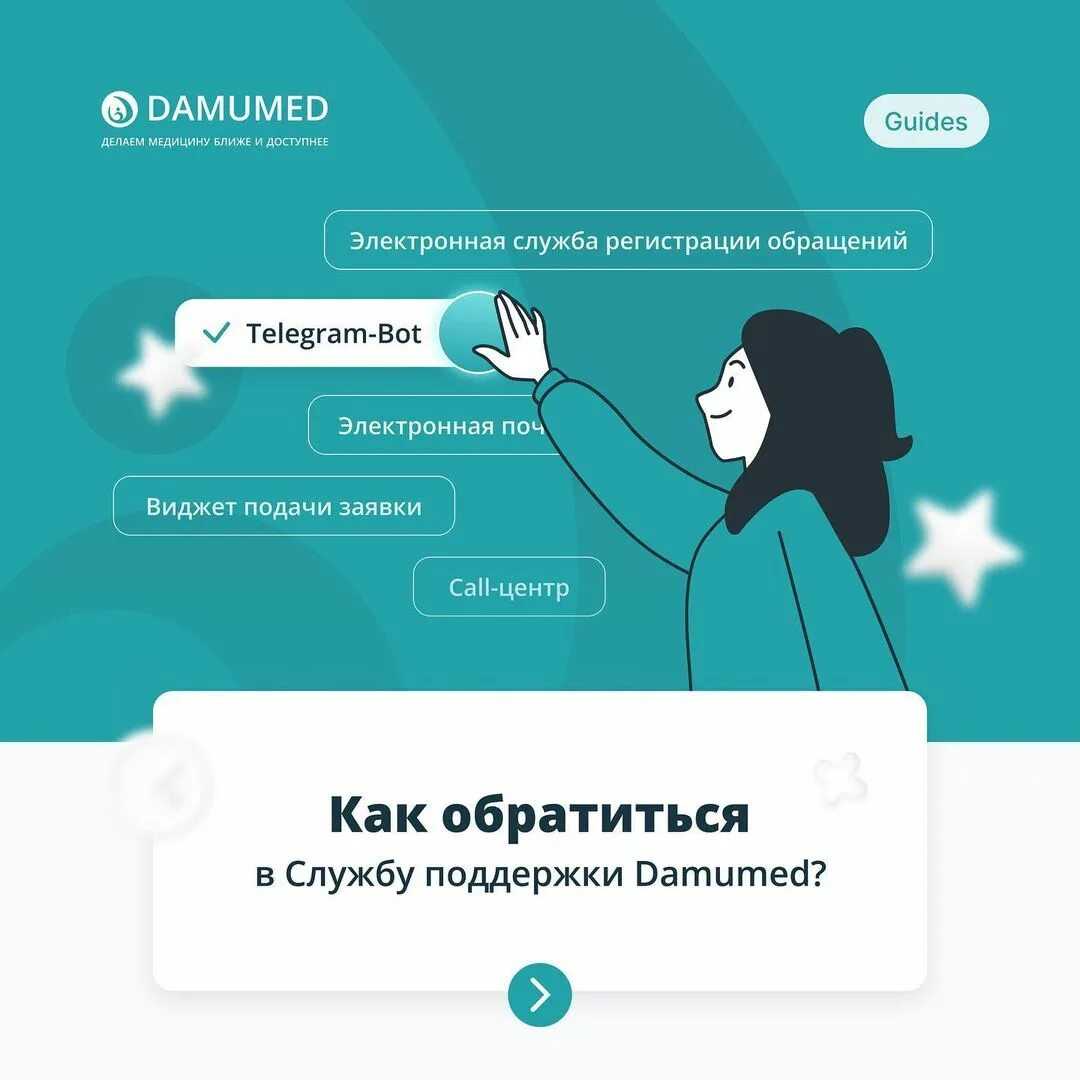
Функции, доступные пользователям PBX-телефонии
АТС-телефония на базе IP-АТС открывает пользователям доступ к огромному количеству бизнес-опций и возможностей. Например, один из крупнейших российских провайдеров IP-телефонии, компания «Телфин», предлагает более 90 полезных базовых функций виртуальной АТС. Также вы можете подключить дополнительный функционал, существенно расширяющий возможности виртуальной АТС (АТС-системы).
Среди основных функций, которые, как правило, включены в услуги АТС-телефонии по умолчанию:
- Запись разговоров. Записи можно использовать по-разному, например, для обучения сотрудников колл-центров или менеджеров, например более опытных коллег, или для мониторинга специалистов и оценки качества их работы.
- Голосовое меню. Позволяет снять нагрузку с секретарей и менеджеров: правильно настроенное меню помогает клиентам решить многие проблемы без необходимости общения с «живым» специалистом.
- Статистика звонков. Полезная информация для специалистов по маркетингу. Статистика помогает оценить эффективность маркетинговых кампаний, определить время активности клиентов, источники лидов и так далее
- Управление прочими звонками. Опция позволяет эффективно распределять звонки, управлять загруженностью сотрудников, минимизировать время ожидания на линии для звонящих.
- Голосовая почта Это помогает минимизировать количество неиспользованных транзакций, особенно в нерабочее время.
- Видеосвязь, отправка файлов разных форматов, организация конференций (а также с клиентами и партнерами).
- Интеграция с CRM, BPM и другими системами (программным обеспечением), используемыми клиентами в работе.
В качестве опций для пользователей АТС-телефонии «Телфин» и другие провайдеры предлагают такие функции, как распознавание голоса, генерация речи из текста, подключение виртуальных номеров любого региона без необходимости физического присутствия в них, номера 8-800 .
What Is 3CX All About?
Source: WordPress.org
3CX is all about making customer communication seamless, increasing your lead count, engaging your customers, simple integration, and bridging the gap between the audience and the brand easily and conveniently.
Let’s say there’s a customer who needs to connect immediately to your brand to get assistance for the product or service that he bought from you. The plugin will play an essential role in connecting this person to your sales agent, CSR guy, or anyone else who is responsible for handling such concerns.
Furthermore, if the internal staff is unable to solve a customer’s query via chat, the plugin offers efficient support for getting the customer on an audio or video call to help him/her with his/her concern more profoundly.
Additionally, the setup and installation of this great plugin take the integration process to a whole new level. Here’s how you can install this great plugin and give your business a one-stop complete communication suite:
Styling Your Chat
There are two places where you can style your chat: “ChatBox” and “Styling.” The first one is “ChatBox.” Also, this is a place where you can fully customize your chatbox. From positioning and changing icons to adding some detailed specifics.
Further, we have a “Styling” option. It allows you to change different colors, change chatbox titles, add a welcome message, and so much more.
In its settings, you can find much more options such as:
- Defining the behavior of your chat when you are offline
- Configure the time when you are available
- Enable voice and video calls
- Enabling Gutenberg blocks
Now that you are all set up, the chat should appear on your WordPress website customized the way you like it.
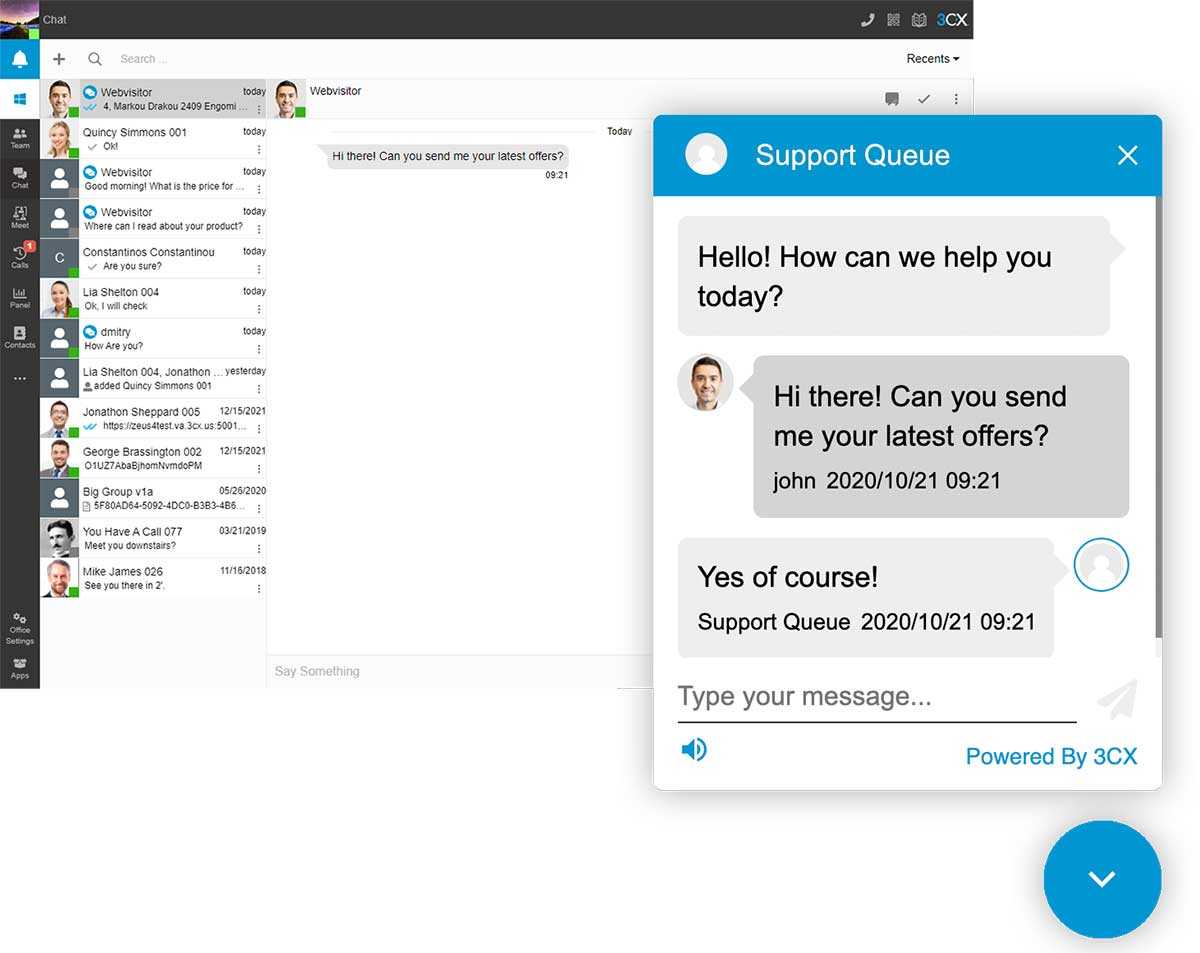
3CX Web Client
We’ve touched upon the web client that comes with the plugin a little bit, but now we’ll look a bit more closely at everything you’ll be able to do.
Representing a universal tool, the web client will be your all-in-one communications interface that includes CRM, Facebook messages, and SMS integration. It was also recently announced that WhatsApp integration will also be added to the plugin’s arsenal. The channels are traced through the client instead of the WP to minimize the resource strain on your site, keeping it as fast as possible.
A unified interface also means it’s much easier to navigate all the various features you’ll be taking advantage of with the chat like adding users and contacts, tracking groups, opening new chats, starting calls or video meetings, etc. If you had a couple of different apps for these features navigation would be slow and because of all the switching, chances of making mistakes would rise – this way everything is in one place making for a much more streamlined experience.
Taking all of this into account, probably, the most important thing the web client will do is give you a much more accessible alternative to the WordPress backend. Anyone who’s had to work on it on their phone will know that because of the device limitations, actions take longer, making it inefficient to use any way other than through a classic desktop. The web client is “cloud native” and designed to be used within a browser, regardless of the device and screen size. This means you’ll be able to access it efficiently any time you want through your phone or tablet.
Установка и настройка плагина
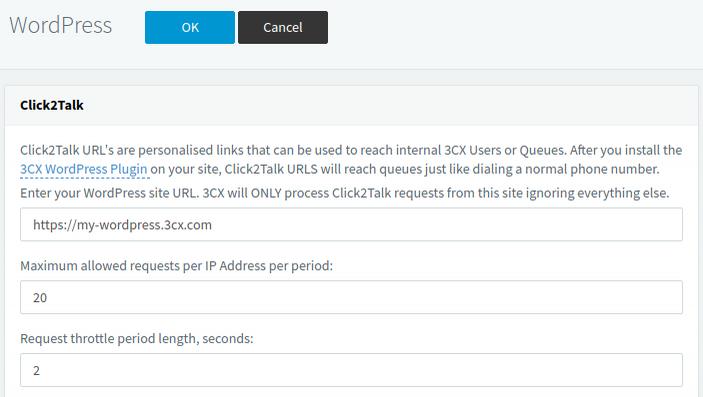
Для установки плагина зайдите в интерфейс управления CMS WordPress и перейдите в раздел Plugins > Add New. Выполните поиск плагина 3CX Live Chat and Talk и нажмите Install Now. После завершения установки перейдите в интерфейс управления 3CX в раздел Settings > WordPress > Click2Talk и укажите URL вашего сайта WordPress (например, my-wordpress.company.com, без »/») для авторизации коммуникаций.
Безопасность подключения реализуется параметром «Maximum allowed requests per IP Address per period», который ограничивает количество входящих, но неотвеченных чат-запросов к добавочному номеру 3CX. Параметр «Request throttle period length, seconds» указывает период в секундах, в течение которого подсчитывается количество неотвеченных чат-запросов.
Создание объекта «Click To Talk»
После установки плагина на сайте, создайте объекты Click to Call. Они используются на определенных Страницах и Записях в блоге или на всем сайте для размещения коммуникационного виджета.
Для создания объекта Click To Talk, в панели администратора WordPress перейдите в раздел 3CX, нажмите Add New и укажите имя объекта.
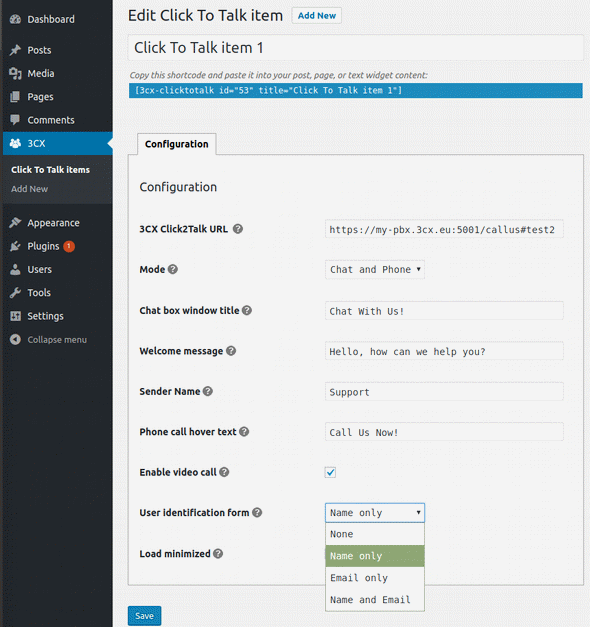
В поле 3CX Click2Talk URL укажите Click2Talk URL из секции Click2Talk/Click2Meet в параметрах добавочного номера (пользователя) 3CX или Очереди вызовов 3CX, которые будут отвечать за коммуникации с посетителями сайта.
Для кастомизации поведения и внешнего вида виджета используются следующие параметры:
- Mode — включить в виджете голосовой вызов, чат или оба способа связи.
- Chat box window title — заголовок виджета.
- Chat welcome message — приветственное сообщение, которое автоматически показывается посетителям сайта в интерфейсе виджета.
- Sender Name — имя сотрудника (пользователя 3CX), которое будет отображаться посетителям сайта при общении.
- Phone call hover text — подсказка, которая показывается посетителю при наведении на иконку телефона, если установлен только голосовой вызов.
- Enable video call — посетили будут сразу начинать видеовызов вместо аудиовызова.
- User identification form — запрос от посетителя имени и/или e-mail адреса для начала коммуникаций.
- Load minimized — показ минимизированной панели коммуникаций (виджета).
3CX Живой чат
3CX Онлайн Чат plugin бесплатен для неограниченного количества чатов, что довольно щедро в области живого чата WordPress.
3CX StartUP бесплатен, и повышение уровня вызовов также бесплатно. Всегда есть бесплатная версия 3CX доступны бесплатно, и на данный момент они переходят с бесплатного Standard 4SC на другое предложение под названием 3CX СВОБОДНО.


Быстрые ссылки:
- Сколько WordPress Plugins Стоит ли устанавливать? Сколько WordPress Plugins слишком много?
- Как настроить защищенный паролем WordPress Plugin
- Список лучших крокоблоков Pluginс (отобрано вручную)
- Топ WordPress Plugins Чтобы сделать ваш сайт адаптивным
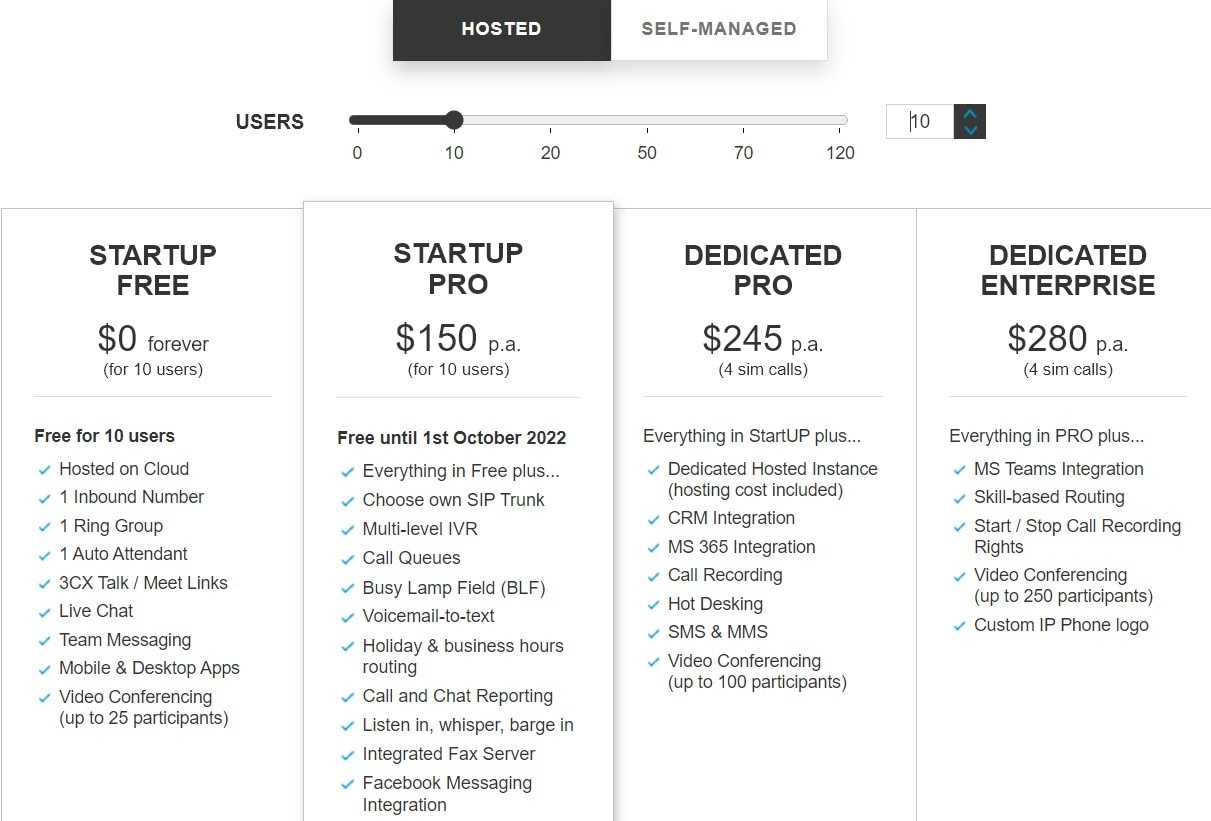
Fees and hosting
The 3CX Live Chat plugin is part of the 3CX StartUP system that comes with 3CX Web Client. It can be obtained for free making it available to anyone looking to enhance their communication methods with their website visitors. It is hosted on a shared instance and can support up to 10 individual users with tools such as video conferencing, a ring group, an auto-attendant, and mobile apps.
However, we need to stress that there is also an option to upgrade to 3CX StartUP PRO that offers the same features as the free edition and includes a few extras for a more tailored experience such as multi-level IVR, call queues and reporting. It also has the option to accommodate a team of up to 20 users, which gives a little more room for a growing business to play around with. For larger businesses and installations there is a range of competitive pricing plans available based on the number of simultaneous calls.
When it comes to deployment options, there are three different types. Firstly we have the aforementioned 3CX StartUP which is a hosted option where the updates and hosting are managed directly by the 3CX. The second and the third options are the ones where you are involved in the installation process.
You can choose to deploy the tool in your cloud, using Amazon, Google, Azure, or other providers, or you could deploy it on-premise on systems that run Windows or Linux. Another interesting option is deploying its owner Raspberry Pi.
With so many different options, the tool is extremely flexible and can be perfect for many businesses.
Шаблоны быстрых ответов
Быстро отвечайте на входящие сообщения по всем каналам коммуникаций — онлайн-чат на сайте, WhatsApp, Facebook и SMS. Используйте для этого шаблоны быстрых ответов.
- Нажмите на иконку шаблонов , расположенную в левом нижнем углу панели чата, чтобы развернуть список шаблонов. Права на управление шаблонами имеют только пользователи с ролью Manager, Group Owner и System Owner.
- Для выбора шаблона используйте строку поиска, вкладки категорий и выпадающий список языков.
- Нажмите на шаблоне. Текст из шаблона будет автоматически скопирован в окно ответа. Затем ответ можно изменить и отправить пользователю.
3CX Phone System Pros & Cons
Based on available features, customer reviews, and our own research, the table below shows the top 3CX pros and cons to help you get a better understanding of overall user experience.
| 3CX Pros | 3CX Cons |
| — Plug-and-play auto-provisioning with phones from Fanvil, Yealink, and Grandstream.
— Compatible with Android, iOS, and Windows desktop/mobile devices, plus browser-based Web Client |
|
| — One-year free trial of Standard Plan for teams of 12 or less
— One-year free trial for up to four simultaneous calls on Pro and Enterprise Plans |
|
| — Robust third-party integrations included in plans, such as Salesforce, Zoho, Zendesk, HubSpot, and mor |
Audio and video calls
There’s one feature that is very important and one that differentiates 3CX Live Chat from its competitors. If your visitors still have doubts or uncertainties following a conversation with the agent over live chat, they can quickly switch to a voice call or even a video call. The voice and video calls are conducted over your browser which means that there are no extra costs for the business or the customer
This is the quickest way of resolving your customer’s issues. You also save a lot of time for your customers; they won’t have to go down to the contacts section to see which phone they have to call to get the necessary information, or have to repeat their issue to multiple different operators. The call button is right there, in the chat window ready to connect you to the same agent in just a click of a button. Many customers will be thankful for this lower contact barrier and will thus be more inclined to use the service. Since the calls are completed over the browser it will result in no additional cost for the business or the customer.
Настройка телефонных линий и вызовов
После успешной установки и настройки 3cx системы вам необходимо настроить телефонные линии и вызовы.
Вам понадобится следующая информация:
- Номера телефонных линий, которые необходимо настроить
- Номера телефонов или SIP-адреса сотрудников для привязки к телефонным линиям
- Информация о телефонных операторах и их требованиях
Для настройки телефонных линий и вызовов выполните следующие шаги:
- Войдите в административную панель 3cx системы, используя свои учетные данные администратора
- Откройте раздел «Линии» или «Менеджер линий» в зависимости от версии 3cx системы
- Нажмите на кнопку «Добавить линию» или «Создать новую линию»
- Введите номер телефонной линии и выберите соответствующего оператора связи
- Укажите дополнительную информацию о линии, если необходимо
- Нажмите на кнопку «Продолжить»
- Привяжите номера телефонов или SIP-адреса сотрудников к новой линии
- Настройте правила переадресации, голосовую почту и другие параметры для линии
- Нажмите на кнопку «Сохранить» для применения настроек
После завершения этих шагов вы успешно настроите телефонные линии и вызовы в 3cx системе. Будьте внимательны при вводе информации и следуйте указаниям оператора связи для корректной настройки.
Setup Your 3CX Account
Before you set up the plugin on your WordPress site, you’ll first need to set up your 3CX account in your browser:
- Sign up for your free 3CXStartUP account.
- Add your agents and manage their permissions to the 3CX Web Client (managers, receptionists, standard users).
- Determine if you’ll use a SIP Trunk, which is needed for inbound and outbound calls, or if you’ll use the system just for internal communication and the Live Chat – in which case just click “Next”.
- Now you can start setting up your live chat by choosing the option “Yes” and selecting if you have a WordPress website and if you do input the URL and click “Set”.
- You need to link the Web Client to the plugin, so download and activate the plugin. Copy the 3CX Talk URL and save it for later. The 3CX Talk link is what is used to connect your two platforms – the Web Client and plugin. It enables sharing data regarding chats, calls and video calls. Everything is run through the browser, so there’s no need for telephone calls.
- With that, you’re done. You can now log in using the “Login” button and access your dedicated 3CX Web Client which is the place all your customization options and chat messages are located.
Now that you have access to your Web Client, it’s time to configure the Live Chat.
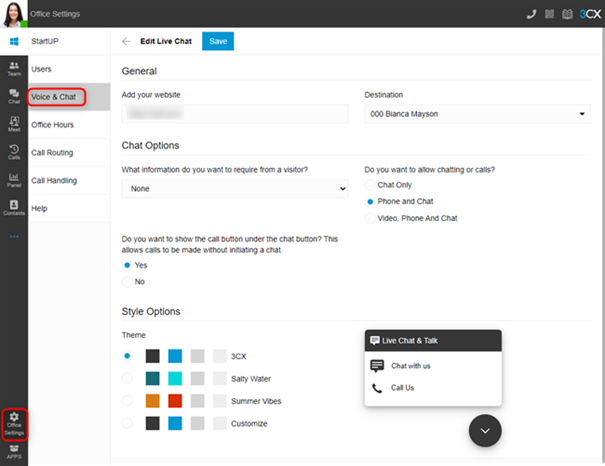
- To set up live chat so that calls and messages can be answered from the Web Client, use the “Office Settings > Voice & Chat” and click on the pencil icon.
- Your website address will already be populated from the wizard process, but you can change it if you want.
- The “Destination” field shows where live chat messages or calls will be sent. To change the “Destination”, navigate to “Office Settings > Call Routing” and choose your destination. By default, the live chat will be routed to a ring group, so someone will quickly answer any query.
- Under the “Chat Options” section, use the drop-down selection to choose what information visitors need to provide to connect.
- Use the radio buttons to choose if you want to allow “Chat Only”, “Phone and Chat”, or “Video, Phone, and Chat”.
- If you want the option for “Call Us” to be displayed immediately on the chat bubble, use the radio button to show or hide the option.
- Under “Style Options” choose from one of the 3 pre-defined themes or select “Customize” which gives you more creative freedom.
- Use the preview of the chat bubble to interact and test the functionality and when you’re done click on “Save” to finish up.
Now comes the part that requires you to access the plugin.
- Log in to the admin panel of your WordPress website
- Navigate to “Plugins” and click “Add New” at the top of the page
- Click on “Upload Plugin” at the top and choose the file you downloaded during the sign-up process. The same can be found through the Web Client in “Office Settings > Voice & Chat” by clicking the ‘i’ icon next to the pencil icon. Then click “Install Now”
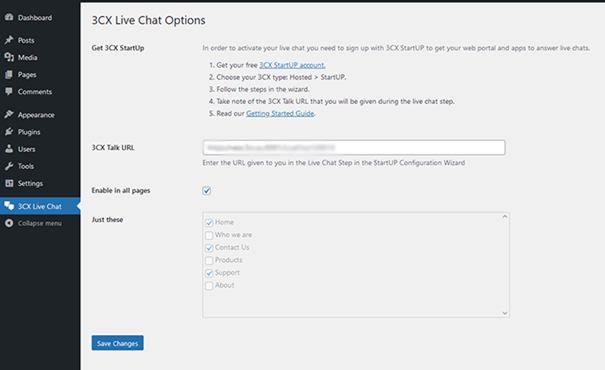
- After installation, click on “3CX Live Chat NextGen” in the sidebar
- Paste the URL you copied earlier (the 3CX Talk URL). If you haven’t copied it, you can find it again in the Web Client in “Office Settings > Voice & Chat” under the “Information” field or within the email you received previously.
- Either tick the box to show the chat on all pages or use the tick boxes below to select individual pages. Finally, click “Save Changes” and you’re good to go.
Стоимость лицензии – цены и тарифы
WordPress-плагин live-чата 3CX в standalone-режиме (автономно, без синхронизации с облаком/сервером) можно использовать полностью бесплатно, правда, у вас не получится отключить копирайт в футере виджета.
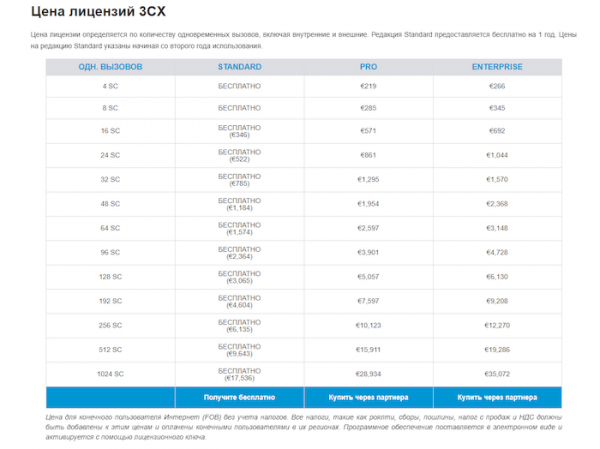
Тариф Standard – на первый год полностью бесплатный. Начиная со второго года использования – от 346 евро/год. Вы можете не дожидаться окончания пробного периода (например, если вам нужна привязка к своему домену) и сразу перейти на платную версию. Вместе с тем, если ограничения бесплатной standard-версии вас устраивают, вы можете продолжать пользоваться ВАТС и далее бесплатно, если количество одновременных вызовов не превышает 8-ми.


Тариф Pro – от €219/год (примерно около 12 человек операторов, до 4 одновременных вызовов). Открывает доступ к интеграции CRM, SMS-шлюзов, модулю колл-центра, расширяет количество участников веб-конференций до 100 человек.
Тариф Enterprise – от €266/год (около 12 операторов, до 4 одновременных вызовов). Помимо функций Pro-тарифа добавляет возможность блокирования отключения записи разговоров сотрудниками, резервирование серверной мощности (дублирование/расширение при пиковых нагрузках за счёт параллельного хостинга 3CX) и брендирование экранов IP-телефонов. Количество участников веб-конференций может быть уже до 250 человек.
Привязки к количеству пользователей на самом деле нет, считаются только одновременные подключения/вызовы (максимальное количество пользователей учитывается только при организации web-конференций).
Готовую аппаратную АТС на RASPBERRY PI можно приобрести всего за 99 евро (рассчитана на работу не более 50 пользователей, оборудование не отменяет необходимость покупки лицензии ВАТС).
Помимо лицензии на ВАТС 3CX, вам понадобится аренда виртуального сервера, облачного хостинга или покупка своей аппаратной платформы (ПК/сервер в офисе с постоянным подключением к сети).
Если вам важна работа на своём домене, его и сертификат SSL нужно приобретать и продлевать отдельно.
Техподдержка платная – 75 евро за каждое обращение.
3CX StartUP Installation and Setup
For the first phase of the installation process you’ll need to set up 3CXwhich can be done through your browser in just a few steps:
- Sign up for your free account.
- Add your users or agents to the system and assign them roles (managers, receptionists, standard users). They will answer chat messages and use other system features – your first line of contact to the visitor.
- Determine if you’ll use a SIP Trunk, which is used for inbond and outbound calls. If you’ll be using the system just for Live Chat and internal communication simply skip this part and click on “Next”.
- Now you can start setting up your live chat by choosing the option “Yes” and selecting if you have a WordPress website or not. Enter your website URL and click “Set”.
- You need to link the web client to the plugin, so download and activate the plugin and then copy the 3CX Talk URL and save it for a later stage. The 3CX Talk link is what is used to link your website to your 3CX account. It creates the bridge that carries the chats, calls and video calls. Everything is run through the browser so there’s no need for telephone calls.
- With that you’re done. Through the “Login” button you can access your dedicated 3CX Web Client which is the place all your customization options and chat messages are located.
Once you have access to the Web Client the first thing you ought to do is configure the Live Chat. Just like the general setup, it’s a pretty straightforward process.

- To set up Live Chat so that calls and messages can be answered from the Web Client, go to “Office Settings > Voice & Chat” and click on the pencil icon.
- Your website address will already be populated from the wizard process, but you can change it afterward.
- The “Destination” field shows where live chat messages or calls will be sent. To change the “Destination”, navigate to “Office Settings > Call Routing” and choose your destination. By default, the live chat will be routed to a ring group, so anyone can pick up.
- Under the “Chat Options” section, use the drop-down selection to choose what information visitors need to provide.
- Use the radio buttons to choose if you want to allow “Chat Only”, “Phone and Chat”, or “Video, Phone, and Chat”.
- If you want the option for “Call Us” to be displayed immediately on the chat bubble, use the radio button to show or hide the option.
- Under “Style Options” choose from one of the 3 pre-defined themes or select “Customize”. For the last option, click on each of the color tiles and use the pop-up color picker or enter your RGB numbers.
- Use the preview of the chat bubble to interact and test the functionality and click on “Save” to finish up.
There are other features you can explore within the Web Client, but first you’ll need to hop over to your WordPress backend to set up and connect the plugin.

- Log in to the admin panel of your WordPress website
- Navigate to “Plugins” and click “Add New” at the top of the page
- Click on “Upload Plugin” at the top and choose the file you downloaded during the sign-up process beforehand. The same can also be obtained from the Web Client in “Office Settings > Voice & Chat” and click the ‘i’ icon next to the pencil icon. Then click “Install Now”
- Once installed, click on “3CX Live Chat NextGen” in the sidebar
- Paste the URL you copied earlier (the 3CX Talk URL). If you haven’t copied it, you can find it again in the Web Client in “Office Settings > Voice & Chat” under the “Information” field or within the confirmation email sent during the setup process.
- Either tick the box to show the chat on all pages or use the tick boxes below to select individual pages. Finally, click “Save Changes” and you’re done.
To begin with the live chat, you need to install the plugin on your WordPress site. Log into your WordPress dashboard and click the ‘Add New’ button in the Plugins area. You can find 3CX Live Chat by searching by keyword. You’ll be sent to a setup wizard after clicking the ‘Install Now’ button and then ‘Activate.’
Conclusion
To summarize, the 3CX Live Chat is a powerful arsenal of tools aimed at solving the communication problems between the website visitors and the company offering goods or services on the said website. The multichannel integration and the offering of both audio and video calls are something that separates this tool from the competition. There is also a plethora of security options that will ease the minds of even the weariest off users. You can only allow certain country codes, separated by a continent, change admin credentials, blacklist unwanted numbers and prank callers, and much more.
And the best thing that we have to mention once again is that you can use it for free. Considering the level of customization, adaptivity, and usefulness that this tool provides, we highly recommend that you give it a try.
Integrating 3CX Live Chat into WordPress
Before installing, I first needed to create a 3CX account. Recently, 3CX started offering its 10-user StartUP plan for free. Many small businesses may find this has plenty of users with the option to upgrade to a more advanced plan later. For the purposes of a Live Chat service, this plan offers everything necessary.
Once I opted to create a new account, I was prompted to enter the site URL where the 3CX install would be. To take advantage of the StartUP plan, I opted for Hosted which subsequently asked for the StartUP option (under 10 users) or the dedicated option (over 10 users).
I choose StartUP which automatically enrolled me in a 3-month free trial for the StartUP Pro which includes 2 users and additional features such as a choice of SIP Trunk, multi-level IVR, call queues, call and chat reporting. I would have preferred that it is clear that you begin on a trial plan and what would happen after 3 months. In addition, it would be ideal if you could proactively downgrade the product instead of waiting it out.
Option screen for hosted or self-hosted options.
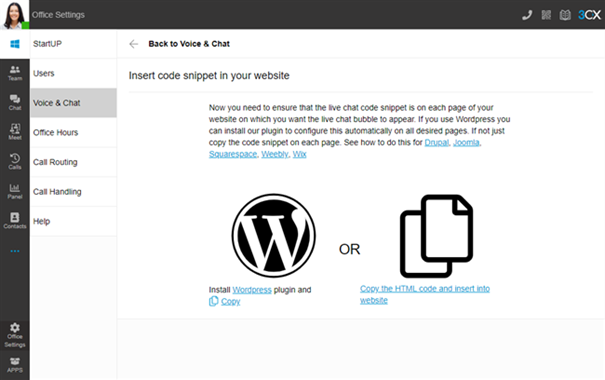
Once the system is created, you will be presented with your unique portal details, initial user creation, and the option to set up Live Chat. If you have a WordPress site you will simply follow the instructions to download the WordPress plugin and enter the necessary configuration. For non-WordPress sites, the required HTML code will be available to add to your website’s source.
Setup 3CX Live Chat screen.
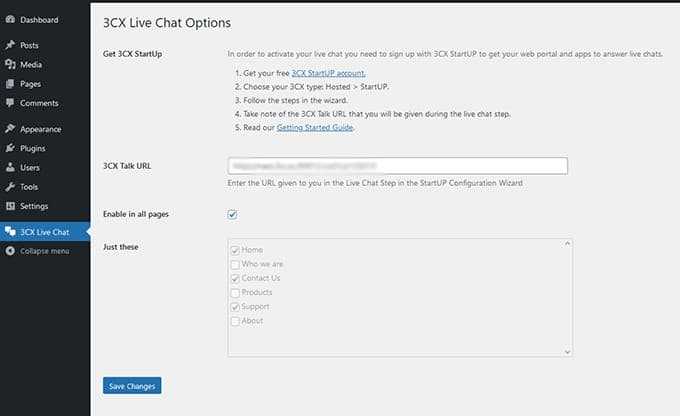
Install the WordPress plugin and navigate to the 3CX Live Chat Options page. Enter the given 3CX Talk URL, set the required options, and click Save Changes. One nice option is the ability to enable the live chat option on all pages or only specific pages.
One limitation to this user interface (UI) is the lack of ability to configure custom post types. For example, I may have a “book” custom post type that I would like to allow the live chat on. Here, it’s either all pages or just certain pages. This also goes for taxonomies, such as a specific category. Though useful, it is very limited in customization. In future iterations, I would like to see the ability to customize where and when the plugin is available.


The options page in WordPress for 3CX Live Chat.
Conclusion
Nowadays, the digital world is growing quickly, and keeping up with the pace is critical to thriving. Otherwise, a firm would enter the striving phase, when it continually verges losing everything.
As a result, to keep on track, provide a positive customer experience, and increase engagement, you’ll need to employ a clever solution, which in today’s scenario (live chat) is 3CX.
Overall, we have found 3CX Live Chat one of the most adaptable WordPress live chat systems. In contrast to SaaS tools, you receive your own hosted instance. You may also host it on your server or in the cloud.
This gives you a lot more control, freedom and sophisticated capabilities like boosting live chat sessions to a phone call.